Understanding the Smokey Eye
What is a Smokey Eye?
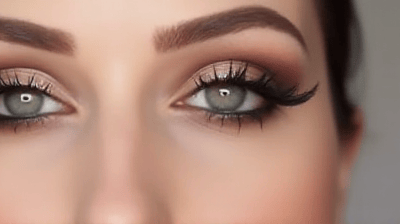
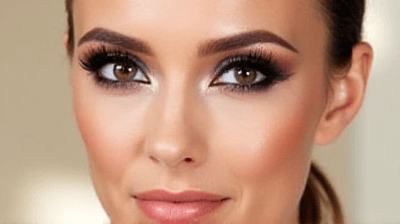
A smokey eye is characterized by its sultry, blended appearance, often involving darker shades around the eyelids and a seamless gradient that adds depth and intrigue. While black is the traditional choice for a smokey eye, this look can also be created using various colors to match your personal style and mood.
Why Choose a Smokey Eye Look?
- Versatility: The smokey eye can be customized for any occasion—from subtle day looks to bold evening glamour.
- Enhances Eye Shape: The blending techniques used in a smokey eye can enhance the natural shape of your eyes, drawing attention to them.
- Timeless Appeal: The smokey eye is a classic look that remains in vogue across seasons and trends.
Step-by-Step Guide to Achieving a Flawless Smokey Eye
Step 1: Gather Your Tools and Products
Before diving into the application process, ensure you have all the necessary tools and products ready. Here is a list of items you will need:
- Eyeshadow Primer: Helps to create a smooth base and increase the longevity of your makeup.
- Eyeshadow Brushes:
- Flat shader brush for packing color
- Blending brush for seamless transitions
- Pencil brush for precise application
- Eyeliner: Gel, pencil, or liquid eyeliner in black or dark brown.
- Mascara: For voluminous lashes.
- Eyeshadow Palette: Choose a palette with a range of colors, including dark shades for the lid, transition shades, and highlighters.
- Highlighter: For adding brightness to the inner corner and brow bone.
Step 2: Prepare Your Eyes
Preparing your eyes is crucial for ensuring a long-lasting and flawless smokey eye look. Follow these steps:
-
Cleanse and Moisturize: Start with clean, moisturized skin. Apply a gentle eye cream to hydrate the area around the eyes.
-
Apply Eye Primer: Use an eyeshadow primer to create a smooth canvas. This will help prevent creasing and ensure the eyeshadow adheres better.
Step 3: Choose Your Color Palette
While black is the classic choice for a smokey eye, you can opt for other shades depending on your desired look. Here are some popular alternatives:
- Traditional Black/Gray: For a classic and dramatic look.
- Brown: A softer option that is perfect for daytime.
- Colorful Shades: Try navy blue, plum, or deep green for a twist on the smokey eye.
Step 4: Applying the Base Eyeshadow
-
Select a Transition Shade: Choose a soft, neutral shade that complements your skin tone. This shade will help blend the darker colors into the crease.
-
Apply to Crease: Using a fluffy blending brush, apply the transition shade to your crease. Use soft, back-and-forth motions to ensure a seamless blend.
Step 5: Add Depth with Darker Shades
-
Choose Your Dark Shade: Select the dark shade that will form the base of your smokey eye. This could be a deep black, gray, or any other dark color of your choice.
-
Pack on Color: Using a flat shader brush, pack the dark shade onto your eyelid, starting from the lash line and working your way up to the crease. Focus on the outer corner initially to create depth.
-
Blend: After packing on the color, use the same blending brush you used for the transition shade to blend the edges. This creates a softer transition and prevents harsh lines.
Step 6: Define the Lower Lash Line
-
Apply the Dark Shade: Using a pencil brush, apply the dark shade along the lower lash line. Blend it out to create a cohesive look between the upper and lower eyelids.
-
Add a Mid-tone Shade: If desired, add a mid-tone or transition shade to the edges of the dark shade on the lower lash line to soften the appearance and enhance the blend.
Step 7: Line Your Eyes
-
Choose Your Liner: Depending on the effect you want, select a gel, pencil, or liquid eyeliner. For a smokey eye, gel or pencil liners are typically preferred for their blendability.
-
Apply Liner: Apply the eyeliner along your upper lash line, keeping the line thicker towards the outer corner. Use a smudge brush or a clean finger to gently smudge the liner for a soft look.
-
Lower Lash Line: If desired, line the lower waterline and smudge it slightly for added intensity.
Step 8: Brighten the Inner Corner
-
Select a Highlighter: Choose a shimmery or matte highlighter that complements your eye look.
-
Apply to Inner Corner: Using a small brush or your fingertip, apply the highlighter to the inner corner of your eyes.
-
Brow Bone Highlight: For added dimension, apply a touch of the same highlighter to the brow bone.
Step 9: Finish with Mascara
-
Curl Your Lashes: Use an eyelash curler to curl your lashes before applying mascara.
-
Apply Mascara: Generously apply mascara to both the upper and lower lashes. For added drama, consider using false lashes.
Step 10: Final Touches
-
Check for Flaws: Take a moment to check your eyes in natural light. Make any necessary touch-ups to ensure symmetry and blend.
-
Clean Up: If there is any fallout, use a makeup remover or a cotton swab to clean up the area around your eyes.
-
Set Your Makeup: To enhance the longevity of your look, consider using a setting spray to keep everything in place.
Tips for a Successful Smokey Eye
- Practice Makes Perfect: Achieving the perfect smokey eye takes practice. Don’t be discouraged if your first attempts aren't flawless.
- Adjust the Intensity: Customize the intensity of your smokey eye based on the occasion—subtle for day and dramatic for evening.
- Experiment with Colors: There are no hard rules when it comes to color. Experimenting with different shades can lead to exciting and unique looks.
- Invest in Quality Brushes: Quality brushes can make a significant difference in blending and application, so invest in a good set of makeup brushes.
- Stay Organized: Keep your makeup area organized to make the application process smoother and more efficient.
Conclusion
The smokey eye look is a stunning and versatile makeup technique that can be achieved with a little patience and practice. By following this step-by-step guide, you can master the art of creating a flawless smokey eye suitable for any occasion. Remember to have fun with the process and don’t hesitate to experiment with different colors and techniques to find the perfect smokey eye that complements your unique style.
With each attempt, you'll gain more confidence in your skills, and soon the smokey eye will become one of your go-to looks. Whether it's for a casual day out or a glamorous night event, the smokey eye is bound to make a statement. So grab your brushes, unleash your creativity, and enjoy the transformative power of the perfect smokey eye!