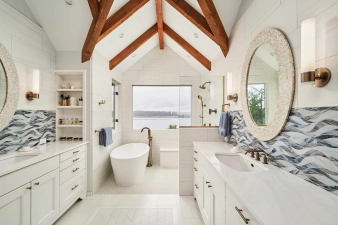
What is Upcycling?
Upcycling is the process of taking unwanted or discarded materials and transforming them into new products of higher quality or value. This practice not only prevents furniture and materials from ending up in landfills but also provides an opportunity for creativity and self-expression. By upcycling old furniture, you can create unique pieces that reflect your personal style while contributing to environmental sustainability.
Benefits of Upcycling Old Furniture
-
Cost-Effective: Upcycling allows you to save money by using materials you already own or can acquire cheaply. Rather than purchasing brand-new items, you can create something beautiful and functional at a fraction of the cost.
-
Customization: One of the biggest advantages of upcycling is the ability to customize furniture to suit your specific taste and home decor style. You can choose colors, patterns, and designs that best reflect your personality.
-
Unique Creations: Upcycled furniture pieces often carry a story and a sense of character that new items lack. You can create one-of-a-kind pieces that stand out in your home.
-
Sustainability: By upcycling, you reduce waste and conserve resources, which is an important step toward living a more sustainable lifestyle.
-
Skill Development: Engaging in upcycling projects can improve your DIY skills and boost your confidence in home improvement activities.
Tools and Materials for Upcycling
Before diving into specific project ideas, it's important to have a good understanding of the essential tools and materials that can facilitate your upcycling journey. Here are some key items to have on hand:
Basic Tools
- Screwdriver: Useful for removing hardware, disassembling furniture, and making adjustments.
- Drill: Essential for adding new hardware or making holes for assembly.
- Sandpaper: Important for smoothing surfaces before painting or staining.
- Paintbrushes and Rollers: Necessary for applying paint or finishes evenly.
- Measuring Tape: To ensure precise measurements when cutting or fitting pieces together.
- Utility Knife: Handy for cutting fabric, tape, and other materials.
- Clamps: Useful for holding pieces together while glue sets or screws are tightened.
Essential Materials
- Paint: Choose high-quality paints suitable for furniture; chalk paint, acrylic paint, and milk paint are popular options.
- Stain: Wood stains can enhance the natural beauty of wood while providing a protective finish.
- Fabric: For upholstery projects, consider using fabric that complements your decor. Look for durable options that can withstand wear and tear.
- Adhesives: Strong adhesives or wood glue are essential for securing pieces together.
- Sealants: A clear sealant can protect painted or stained surfaces from wear and moisture.
Creative Upcycling Ideas for Old Furniture
Now that we have covered the benefits of upcycling and the tools needed, let us explore some inspiring project ideas that can help you reproduce and transform old furniture into stunning new pieces.
1. Vintage Chair Makeover
Materials Needed:
- Vintage chair
- Sandpaper
- Paint or stain
- Upholstery fabric
- Staple gun
- Foam padding (if needed)
Instructions:
- Assess the Chair: Check the chair's condition. If the frame is sturdy, you can proceed with the makeover.
- Sand the Frame: Use sandpaper to remove old paint or finish. This step will help the new coat adhere better.
- Paint or Stain: Choose a color or stain to apply to the frame. Use a brush or roller for even coverage. Allow it to dry completely.
- Reupholster the Seat: If the padding is worn, replace it with new foam. Cut the new upholstery fabric to size, leaving extra material to wrap underneath.
- Attach the Fabric: Position the fabric over the seat, pulling it tight, and use a staple gun to secure it on the underside. Trim any excess fabric.
- Reassemble if Necessary: Put any pieces back together, such as arms or legs, and enjoy your refreshed vintage chair.
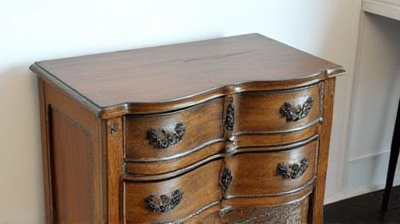
2. Dresser to TV Console
Materials Needed:
- Old dresser
- Sandpaper
- Paint or stain
- New hardware (optional)
- Saw (if modifying size)
Instructions:
- Choose the Dresser: Find a dresser that fits your space and style. Make sure it’s in good condition to start.
- Prepare the Dresser: Remove any drawers and hardware. Sand the surface to prepare for painting or staining.
- Modify the Dresser: If needed, remove the front panels of some drawers to create open compartments for media devices or decor.
- Paint or Stain: Apply paint or stain to the entire dresser, ensuring an even coat. Allow it to dry.
- Add New Hardware: If you want an updated look, replace old knobs and pulls with stylish options.
- Set Up with Electronics: Place your television and any other electronic devices on top, using the drawers for storage.
3. Bookcase to Garden Display
Materials Needed:
- Old bookcase
- Sandpaper
- Outdoor paint or sealant (if using outdoors)
- Decorative elements (pots, plants, decor)
Instructions:
- Examine the Bookcase: Ensure it is sturdy enough for outdoor use if that’s your intention.
- Sand Down the Surface: Remove any old finishes to create a smoother surface for painting.
- Paint or Seal: Apply outdoor paint to protect the bookcase from the elements, or simply use a sealant if you prefer the original wood.
- Style the Shelves: Add potted plants, gardening tools, and decorative items to the shelves to create a charming garden display.
- Secure to the Ground (if outdoors): Consider anchoring the bookcase to prevent it from tipping over in strong winds.
4. Pallet Coffee Table
Materials Needed:
- Wooden pallets
- Sandpaper
- Wheels (optional)
- Stain or paint
- Clear sealant
Instructions:
- Select Quality Pallets: Look for clean and safe pallets (look for the IPPC stamp).
- Sand the Pallets: Smooth rough edges and surfaces to avoid splinters.
- Build the Table: Decide on the dimensions you want. You can stack two or three pallets for height if desired.
- Add Wheels: If you want a movable table, attach wheels to the bottom.
- Stain or Paint: Choose a color or stain to finish the table. Apply sealant for protection.
- Decorate: Use the table for drinks, books, or as a display for plants.
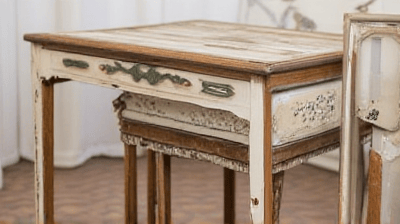
5. Side Table from a Nightstand
Materials Needed:
- Old nightstand
- Sandpaper
- Paint or stain
- New hardware (optional)
Instructions:
- Choose the Nightstand: Look for a piece that matches your decor needs.
- Sand the Surfaces: Remove the old finish for a clean slate.
- Paint or Stain the Piece: Apply your chosen finish, making sure to cover all surfaces completely.
- Change Hardware (if desired): Swap out knobs or pulls for a contemporary look.
- Set Up in Your Space: Place the nightstand in a new location as a stylish side table.
6. Drawer Organizer
Materials Needed:
- Old dresser drawers
- Sandpaper
- Paint or stain (optional)
- Dividers or cardboard (optional)
Instructions:
- Remove the Drawers: Take drawers from an old dresser and clean them out.
- Prepare the Drawers: Sand down any rough edges and surfaces.
- Optional Painting: Paint or stain the drawers for a fresh look.
- Add Dividers: Use dividers or cardboard to create sections if desired. These can be used in the office, kitchen, or bathroom to organize items effectively.
- Display or Use: Place the organizers on shelves or desks as functional decor.
7. Kitchen Island from a Table
Materials Needed:
- Old table
- Sandpaper
- Paint or stain
- Bar stools (optional)
Instructions:
- Choose a Sturdy Table: Look for a table that can be raised to counter height, or let the legs stay as is for a casual kitchen island.
- Sand and Prepare the Surface: Blending smooth surfaces is essential for aesthetics.
- Paint or Stain: Apply a new finish to enhance the appearance.
- Add Storage: If the table has drawers, utilize them for kitchen utensils, pots, or towels.
- Accessorize: Consider adding bar stools around the island for additional seating.
8. Garden Bench from Old Doors
Materials Needed:
- Two old doors
- Hinges (if making a folding bench)
- Sandpaper
- Outdoor paint or sealant
Instructions:
- Select Your Doors: Look for solid doors that can support weight.
- Prepare and Sand: Smooth the surfaces, removing old paint or imperfections.
- Build the Bench Frame: Attach the two doors together using hinges for a folding option, or use additional wood for stability.
- Paint or Seal: Apply an outdoor finish to protect from weather elements.
- Set Up in the Garden: Position the bench as a lovely resting spot amidst your flowers or plants.
9. Ottoman from a Coffee Table
Materials Needed:
- Old coffee table
- Foam padding
- Upholstery fabric
- Staple gun
- Sandpaper (if needed)
Instructions:
- Choose a Sturdy Coffee Table: Ensure the table can be transformed into an ottoman.
- Sand and Prepare: Smooth edges for comfort.
- Add Padding: Cut foam to fit the tabletop and secure in place.
- Upholster the Top: Wrap new fabric over the foam, pulling tight, and use the staple gun to attach it underneath.
- Use as an Ottoman: Place the ottoman in your living room as multifunctional furniture.
10. Upcycled Suitcase Side Table
Materials Needed:
- Old suitcase
- Table legs or a small table base
- Sandpaper (if needed)
- Paint or decorative accents (optional)
Instructions:
- Choose a Suitcase: Look for unique styles that will fit your decor.
- Prepare the Suitcase: Clean it thoroughly. If painted, sand or prepare as needed.
- Attach Table Legs: Securely attach table legs to the bottom of the suitcase base.
- Stabilization: Ensure the suitcase is stable and can support weight.
- Decorate or Use as Storage: Utilize the inside for storage and the top for decorative items or as a functional table.
Tips for Successful Upcycling Projects
Plan Ahead
Before starting any upcycling project, take the time to plan your design. Consider functionality, colors, and materials you want to use.
Take Your Time
Patience is essential while working on upcycling projects. Rushing through can lead to mistakes or uneven finishes.
Embrace Imperfections
Remember that character often comes with age. Embrace the imperfections that give your furniture its unique charm.
Get Creative
Let your creativity flow. Feel free to mix styles, materials, and techniques to come up with something original.
Have Fun!
Enjoy the process of creating something new. Upcycling should be a fulfilling experience that allows you to express yourself.
Conclusion
Reproducing old furniture through upcycling is a rewarding and sustainable way to enhance your home decor while keeping costs low. The projects outlined in this guide showcase just a few creative ideas to get you started, from transforming chairs and dressers to creating unique garden benches and coffee tables.
Embrace your imagination, gather your tools, and jump into the world of upcycling. With a little effort and creativity, you can create stunning pieces that not only provide functionality but also tell a story and add a personal touch to your home.